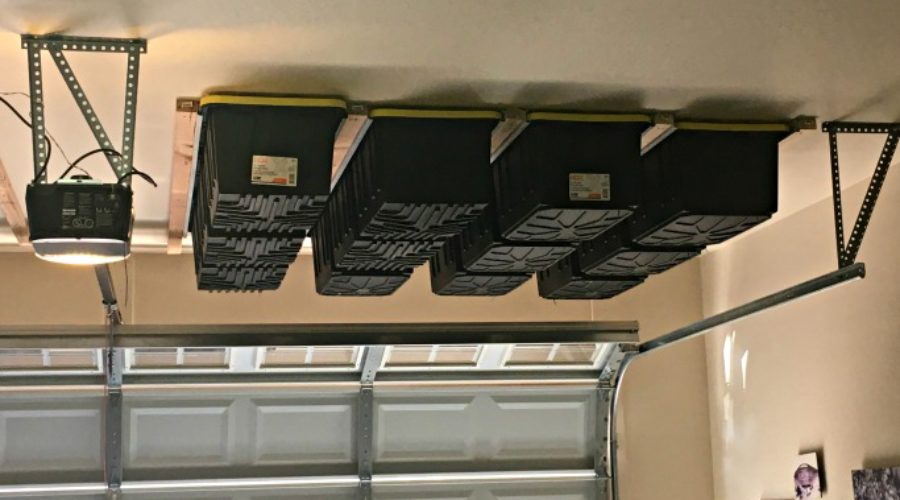
Above Garage Door Storage Tutorial
DIY Above Garage Door Storage
Can you ever have enough Garage Storage?
Garage storage, in some form is a necessity. If your family is like mine, then you will relate. Every time someone needs to store or hide something that doesn’t “work” in the house, it ends up in the garage. Right inside the garage door in the middle of the floor, begging to be tripped over. Dad knows best, or maybe Dad knows where it goes better then me. My pet peeve is having a garage stuffed so full of junk that you have to park your cars outside. So, garage storage has to be built around getting those cars back in the garage.
The problem with garage storage is that some items need to be accessible daily, some monthly, and some once a year. So, it makes sense to design garage storage based on frequency of use. You also need the type of storage that allows you to use your garage. You should be able to park two cars in a two car garage and still have storage.
I have in my garage right now enough Christmas decorations for at least 6 trees, two houses (we only own one), camping equipment for a family of five, car cleaning stuff, and boxes that we haven’t unpacked for at least 7 years.
I decided to tackle garage storage for the stuff that is used really infrequently–holiday decorations.

Above Garage Door Storage Solution
I did get lucky in this house, it is a extra deep garage with 10 foot ceilings. Obviously, extra deep and tall garages offer the most options for creating storage. If you’ve been blessed with high garage ceilings, then this garage storage project is for you.
I saw a infomercial for overhead garage storage that solve my garage storage problem. It’s allows you to store containers on a rail system above your garage door. Whether the door open or closed, they are out of the way hanging out above your parked car. Perfect except that the cost was way more than I wanted to spend.
I went on the look out for a cheaper way to build the same type of rail system. I found some discontinued metal shelving rails at Lowe’s, which I used for a few of the sections. Normally, I know better than buying discontinued items unless I’m sure that they have enough to complete the project. But I bought the eight rails (that’s why you see rails in the pictures) and then had to finish the project using a wood I-beam system. So, this tutorial shows you how to create the entire project using the wood I-beams.
1. Pick out the containers for your project. I liked the idea of 25 gallon containers, but was a little unsure if the weight would become a problem, and settled on 17-gallon containers. I made sure to buy rigid plastic containers with lids that attached securely. Avoid containers made of flexible plastic, or containers with a lid that pops off when you pick it up. Remember, these are going to be hanging above your car. Very important: the containers must have a considerable lip to be supported on the rail system.
Measure the containers to determine 1) how wide your rails need to be and 2) how many containers will fit along your eight foot long stud.
2. Buy I-beam lumber. You’ll need 2 studs for a single row, three studs for two rows, four studs for three rows and so forth. Each I-beam contains 1 2″x3″ stud and 2-1″x4″ pine boards.
Ready to do more Big DIY Projects? Check out all our BIG PROJECTS!
3. Assemble the I-beams. Assemble the beams on the ground by sandwiching a stud between 2-1″x4″ planks using 2 5/8″ grabber screws. Pre-drill the screw holes (aka pilot hole) to prevent your lumber from splitting.
3. Mark the truss for your rails. Locate where the garage door opener outlet is attached to the ceiling. That is attached to the side of a truss. The rafters are on 2 foot centers, so you can measure from the outlet 2 feet all the way across. But the easiest way to find your studs is with a stud finder, a cool tool that you drag along the drywall that beeps when it locates the stud.
4. Measure twice! Lay everything out on the floor of the garage exactly how you will be attaching it to the ceiling. Make sure every I-beam is positioned to be securely attached to a ceiling truss. If you don’t attach them to the ceiling truss they will fall! Mark your ceiling accordingly.
4. Screw each I-beam to the trusses. Use 3 inch grabber screws to attach the I-beams to your ceiling. Don’t forget to pre-drill (pilot hole) the I-beams first to avoid splitting.
Want to see what Big Projects are under construction at our house right now? Follow us on Instagram.
Above Garage Door Ceiling Perfection.
I have never been so happy to help pack Christmas decorations into our new storage boxes. I ended up with 18 containers of Christmas decor. It’s tucked neatly above my cars and gave me so much needed storage.
If you’re needing some extra storage I would strongly recommend this above garage door storage system for items you need to access maybe once a year.
Have you tried an above garage door storage system? Let us know what you think in the comments below.
Click the I-beam pic or link below for metric instructions.
http://diydeveloper.io/diy/2014/03/28/build-a-ceiling-storage-system-for-your-garage
This post may contain affiliate links. For more information see our affiliate disclaimer.
This post was shared on these great link parties. You should share too!
This post was featured!


