Witchy Halloween Vinyl Sign – Old Black Magic

DIY Halloween Vinyl Sign Tutorial
Witchy Halloween Sign to Make
Halloween is the perfect time to make a spooky DIY Vinyl Sign using your Cricut Explore Air or Cricut Maker. With thousands of images available with Cricut Access, you can create anything you can imagine.
This is a project that I did LIVE during my Craft & Chat session. It’s a great example of how you can plan a big project directly on your Cricut Design Space canvas so you can visualize your final project.
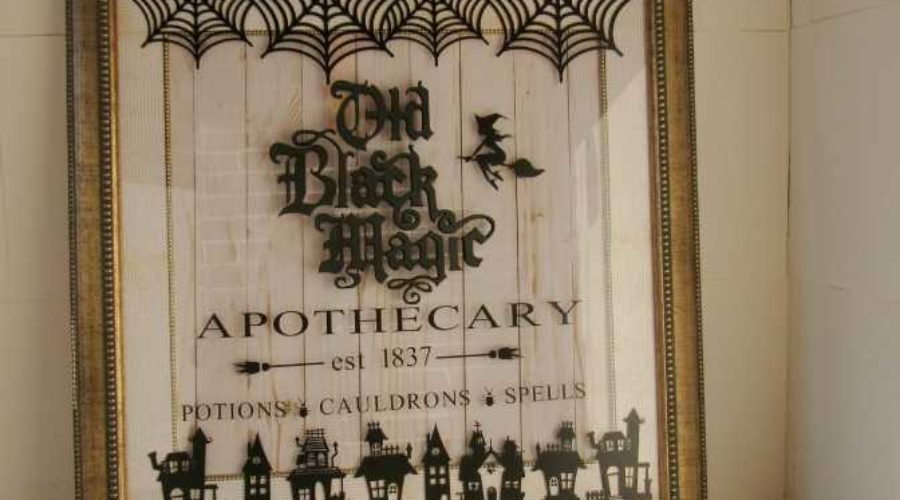
If you wander around this blog at all, you’ll know right away that the perfect projects for me require lots of layering. When you add several layers, and even different materials it gives your project dimension and visual interest. So when I planned out this HUGE Halloween Vinyl Sign, I made sure that there was a lot going on.
Here’s the Best Witch Hat Tutorial
Here’s a Free Witches Brew Cocoa Bar Printable
Here’s 4 Projects for a Bewitching Kitchen
First off, I picked up this frame with a really ugly picture in it at a garage sale for $5. I loved the frame and the fact that it had a nice mat (even if it was a weird color). I knew that I could do something amazing with it because it had good bones.
Check out all my Halloween Projects!
Then I fired up Cricut Design Space and created my project. I started by measuring both the frame and the mat and then I created square shapes in Design Space for each for those exact measurements. I dragged the mat shape on top of the frame shape so that I could see what the basic frame would look like.

Then I searched the Cricut Image Library for haunted houses, witches, spiderwebs and anything else that would look great on a Halloween sign. I tried a few things, added some great lettering and soon had a sign design that I loved.
For the Old Black Magic lettering, I sent the file to my CNC router and cut it out of 1/2″ MDF and then painted it black. You could also buy precut wood letters, or just cut the Old Black Magic out of vinyl.
BUT….the mat and interior center of the frame is much larger than the Cricut would be able to cut. So I decided to cut strips of bookprint scrapbook paper to glue over the top of the mat, overlapping at the corners, and I purchased a posterboard with wood planks from Hobby Lobby for the center.

Then it was time to cut my vinyl. I had to click the eye icon next to the large square shapes I used for the frame and mat because they’re too big to cut. But once those layers were hidden, everything cut really well.
You could put the vinyl on the inside of the frame, but I chose to adhere it directly to the glass. I just liked the way it looked. You can layer however you like. Don’t be afraid to experiment. After this sign was finished I felt that it would have looked better if some of the lettering was inside the frame and the houses and webs were on the glass, but I still like it as is.
Check out the full video below and make a DIY Halloween Vinyl Sign along with me!


