Wood Block Snowman Brings Warm Winter Wishes

12 Days of Christmas- Day #3
SNOWMAN CRAFT
What was your favorite project yesterday? I couldn’t pick just one! Bet you couldn’t either. I’m so excited to participate in the 12 Days of Christmas Blog Hop because I LOVE giving you tons of great ideas for your home, and what better way to do that than to give you more than 40 ideas each day? Thanks to all these talented ladies, you will get 40+ fresh Christmas decor ideas each day! We’re all a bunch of DIY-ers around here, so these ideas are designed for every budget. Isn’t that great? You’ll even get great ideas you’re not used to seeing around here like recipes! Can you tell how excited I am about the next 12 days?
Let’s make an appointment to meet here each morning and be inspired–you can even stay in your pajamas for this party! Let’s get started!
Get great ideas everyday with the 12 Days of Christmas Blog Hop! Click To Tweet
Welcome to the third annual 12 Days of Christmas Blog Hop!
Stop by every day from December first through the twelfth for new ideas you can use to make your season brighter!
Meet Your Hosts
They have all been busy as Elves creating, decorating, cooking and crafting tons of new ideas for you to try this holiday season!
Shirley~Intelligent Domestications I Alli~An Alli Event I Michelle~Our Crafty Mom I Marie~DIY Adulation
Erlene~My Pinterventures I Beverly~Across The Blvd. I Debra~Shoppe No. 5 I Victoria~Dazzle While Frazzled
Megan~C’mon Get Crafty I Michelle~Michelle James Designs I Amanda~Domestically Creative
Deborah~Salvage Sister & Mister I Jeanie~Create & Babble I Sherry~Olives & Okra
Jenny~Cookies Coffee & Crafts I Emily~Domestic Deadline I Bonbon~Farmhouse 40
Leanna~Of Faeries & Fauna I Pam Larmore~P.S. I Love You Crafts I Kelly~North Country Nest I Marie~The Inspiration Vault
Gail~Purple Hues and Me I Lynne~My Family Thyme I Karen~Dragonfly and Lily Pads I Trisha~Blowing Away Out West
Tomika~Life In Pumps I Rachee~Say it, “Rah-Shay” I Lorrin~Embrace The Perfect Mess
Serena~The Weekend Jaunts I Terri~Christmas Tree Lane I Jessica~A Southern Mother
Sam~Raggedy Bits I Cyn~Creative Cynchronicity Valeria~Val Event Gal
Yami~The Latina Next Door I Jeannee~Centsably Creative I Tania~Little Vintage Cottage
Lauren~Wonderfully Made I Vanessa~DIY 180 I Kimberly~A Wonderful Thought I Kim~Everyday Parties
Wood Block Snowman Tutorial

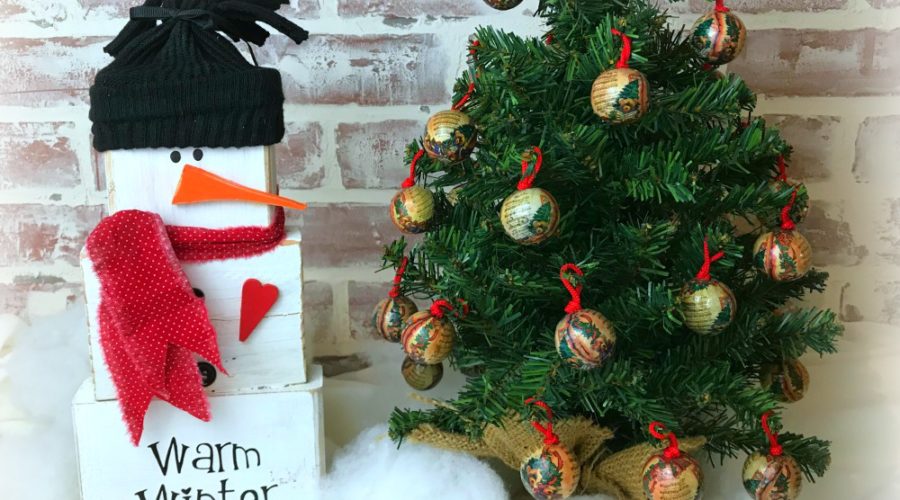
Like Olaf, this wood block snowman is dreaming of warm winter wishes, but he doesn’t have to worry about melting. Wouldn’t he look cute on your coffee table? I have good news because this snowman woodcraft is truly a beginner project. He’s made from blocks cut out of a pine 2’x6′, with a true stocking cap (as it’s made out of a mismatched sock). You can make his cute nose or sweet heart out of 1/4 plywood, or fun foam. The “Warm Winter Wishes” sentiment was hand painted. Not feeling like an artist? No problem! You can leave him bare or write your own version of the sentiment with a black permanent marker. You’ll find a couple of cute sentiments on the project file you can trace onto you project if that suits you.
This FREE project is for personal use ONLY and can NOT be sold or claimed as your own design. By downloading and using this design, you are agreeing to these terms.
Don’t forget to join our insider’s email group! You’ll get access to our complete Freebies Library including the complete project sheet for this sweet Snowman Woodcraft.


Wood Block Snowman Project
Supplies:
1- Pine 2′ x 6′ stud
Paint in white (also in red and orange if you’re making wooden heart and nose pieces)
Fun foam in Red and Orange, or a small sheet of 1/4″ plywood
Sandpaper
Wood Glue
1- Black tube sock (tall sock, at least mid calf length)
3- buttons
Scrap fabric for a scarf
1- Pattern for a sentiment (See the project sheet for details) and a black permanent fine tipped marker
To Assemble:
Cut 3 blocks out of the 2′ x 6′ using a table saw or hand saw. The dimensions for each block is:
5 1/2″ x 5″
4 1/2″ x 3 1/2″
3″ x 3″
Sand them to smooth out the rough cut edges. Paint the blocks white, and glue them on top of each other to form the body of the snowman. I sanded the edges of the blocks after they had been painted for an optional shabby chic finish.
Cut the nose and heart pieces out of the 1/4″ plywood using a jigsaw or band saw. Optionally, cut the pieces out of craft fun foam. If using wood, paint the nose and heart pieces. Once dry, glue them to the snowman.
Make sure you resize the SVG file to fit on the first block of the snowman. Paint the desired sentiment on the Snowman’s body.
Attach the buttons and a piece of fabric for the scarf.
Create the hat by cutting the foot section off of a black tube or tall sock (finally! a use for one of those mismatched socks that haunt your laundry room). Stretch the top band of the tube sock over the top block of the snowman. Fold it up to create a headband. Once that’s in place and you like the way it looks on his forehead, cut the remain part of the sock, leaving at least 4-inches so you can tie it and create the fringe top. I tied the hat with a small piece of black ribbon, but you can also use a piece of the sock for a tie. Once tied, fringe the top by cutting ribbons into the sock.
We shared this idea at these amazing Link Parties, and you should too!
This project was featured!
- http://www.sewhistorically.com/sew-it-cook-it-craft-it-link-party-35/
- http://www.littlebitsofhome.com/2017/12/dream-create-inspire-link-128.html
- https://www.marilynstreats.com/thursday-favorite-things-318/#.WjwHolWnGUk
- https://abbottsathome.com/diy-crafts-link-party-66/
- http://www.stonecottageadventures.com/2017/12/winter-holiday-link-party-features.html#more
- http://www.thepinjunkie.com/2017/12/pin-junkie-pin-party-246.html
NOTES AND RECOMMENDATIONS ON POWER TOOLS
I’ve linked my favorite power tools that I used on this project, in case you’re interested in building a great little workshop set of tools, and a link to the pre-cut wheels we used for the project. I chose beginner versions of each tool. If you know you’re ready to build a quality tool set, upgrade to a Dewalt or Makita jigsaw. The higher price-tag is completely worth it if you’re going to be doing a lot of projects. When it comes to sanders, don’t fall for a square or angle sander. You want an orbital sander. I love, love, love my Makita Orbital Sander with the dust collector and the handle that gives you leverage when you’re sanding. Again, buy the higher quality tools only if you know you’re going to be using them a ton.
You probably already figured out this post contains affiliate links. That means that if you click the link below and buy the product, then I get a tiny (believe me, it’s tiny) commission at no extra cost to you. I don’t make enough to bother recommending products that I don’t like, so everything you see I own, I’ve tried and I highly recommend. If you have more questions, you can read our affiliate link policy here.
Be sure to visit our fellow 12 Days of Christmas Bloggers below for even more creative ideas this holiday season!

If you’re looking to add some simple feel good, do-good service to your holiday, we love the #LightTheWorld 25 Days of Christmas. Get inspiration each day for small acts of kindness. There’s a free downloadable calendar, and a new video each day. Check out today’s video below.


