Sweet and Easy Cat and Friendly Ghost Wood Craft Tutorial

Sweet Cat and Friendly Ghost Halloween Wood Craft Tutorial
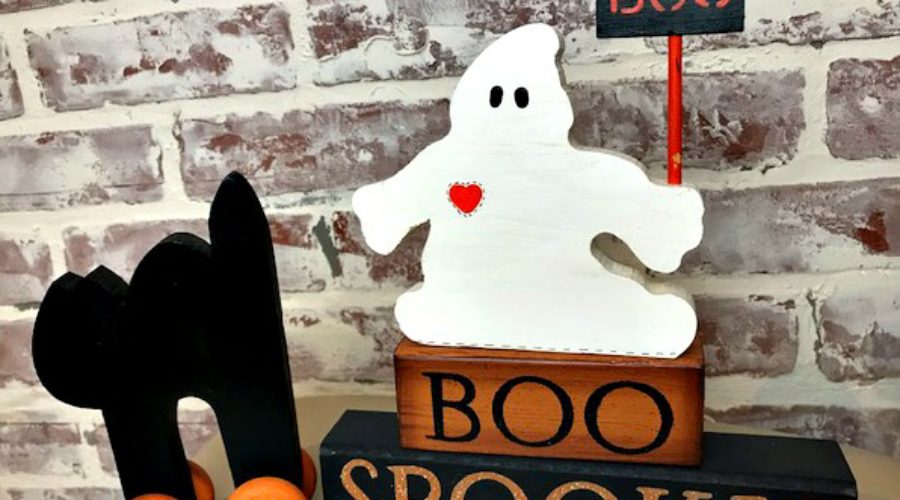
This Sweet Cat and Friendly Ghost set is sure to brighten any Halloween display. I love the simple lines and whimsy of our Sweet Cat on pumpkin wheels and the Friendly Ghost who wears his heart will melt yours. I always try to provide projects that are highly customizable, and these simple shapes are ready for a splash of imagination. Don’t shy away from covering them in decorative paper or glitter. There’s a way to fit this Sweet Cat and Friendly Ghost into almost any Halloween display.
Make your own Friendly Ghost with this free wood project. Click To Tweet
This project is for my girls who love to use power tools (and will make you a convert if you aren’t already). There’s something empowering about skillfully wielding a power tool, and this jigsaw cat and ghost project does just the trick. Never fear, we’re using hand held power tools that are great for beginners.
Here’s what you need to complete this project:
1-Jigsaw with a fine blade (or a band saw if you’re ready to invest in my favorite tool for cutting)
1-Sandpaper or a handheld power sander
1-Drill with a 5/16” drill bit
1-¾” #1 pine. Look for a board 4’ x 5’. You’ll have a lot of extra leftover for other cut-outs. #1 pine is a little more expensive because it won’t have a bunch of knots in it, and that’s what you want for this project.
- ¼” dowel
- Bag of (4) 1-1/2” wood wheels
- Craft paint in black, white and orange
- Sponge brush and a fine brush for the details.
- Sharpie marker in black (one ultra-fine tip, and one fine tip)
Don’t forget your safety gear! Glasses and a particle mask are a must!

Step by step: How to make your Sweet Cat and Friendly Ghost Wood Craft
- Download the pattern for the Sweet Cat and Friendly Ghost here. If you prefer to create a stencil to trace using your Cricut cutter machine, download the SVG files for the Sweet Cat and Friendly Ghost, then use the images to cut traceable stencils out of cardstock.
- Trace the Sweet Cat, Friendly Ghost and the Friendly Ghost’s sign onto your ¾” pine.
- Cut the shapes using the jigsaw or band saw. Don’t worry if the tight areas are rough—we’ll smooth them out in the next step. Cut (2) 2” lengths of dowel for the Sweet Cat’s wheels, and (1) 3” length for the Friendly Ghost’s sign.
- Sand all your pieces until they’re nice and smooth. I love to put my favorite music on and go to town on the wood and don’t forget to wear a particle mask.
- Drill holes in the Sweet Cat’s feet and a hole in the Friendly Ghost’s arm, and the bottom of his sign.
- Now it’s time to paint! Make sure you let everything dry really well before adding the pen and ink details (like the dashed lines around the Friendly Ghost’s heart). I just use a fine tipped Sharpie marker for all the little details, and a thicker tip for the Friendly Ghost’s eyes and the Sweet Cat’s jack-o-lantern wheels. I hand painted the “BOO” on the sign and the little ghost’s little orange heart with a fine artist’s brush.
- Adding a coat of spray poly-urethane is completely optional.
- Once everything is painted and dry, assemble the Sweet Cat’s wheels and the Ghost’s sign.


Bonus Project: The “Spooky” and “Boo” Blocks
If you liked the “Spooky” and “Boo” Blocks I used to display the Sweet Cat and Friendly Ghost, they’re super-easy to make too!
Just add a piece of 2”x2” pine stud to your shopping list.
I cut mine 8” long for the “Spooky” and 4 ½” long for the “Boo.” Then I sanded them really well and painted them.
Because I own a Cricut die cutting machine, I cut the lettering out of black and orange glitter vinyl. But you can also hand paint the lettering, purchase press-on letters, or use a stencil to outline your letters and fill will glue and glitter.
If you give the Sweet Cat and Friendly Ghost project a try, please let me know in the comments below. I’d really love to see your finished project if you’re willing to share!
Wood Shop Tool Notes and Recommendations
I’ve linked my favorite power tools that I used on this project, in case you’re interested in building a great little workshop set of tools, and a link to the pre-cut wheels we used for the project. I chose beginner versions of each tool. If you know you’re ready to build a quality tool set, upgrade to a Dewalt or Makita jigsaw. The higher price-tag is completely worth it if you’re going to be doing a lot of projects. When it comes to sanders, don’t fall for a square or angle sander. You want an orbital sander. I love, love, love my Makita Orbital Sander with the dust collector and the handle that gives you leverage when you’re sanding. Again, buy the higher quality tools only if you know you’re going to be using them a ton.
You probably already figured out this post contains affiliate links. That means that if you click the link below and buy the product, then I get a tiny (believe me, it’s tiny) commission at no extra cost to you. I don’t make enough to bother recommending products that I don’t like, so everything you see I own, I’ve tried and I highly recommend. If you have more questions, you can read our affiliate link policy here.


