Woodland DIY Christmas Ornaments

DIY Farmhouse Christmas Ornaments
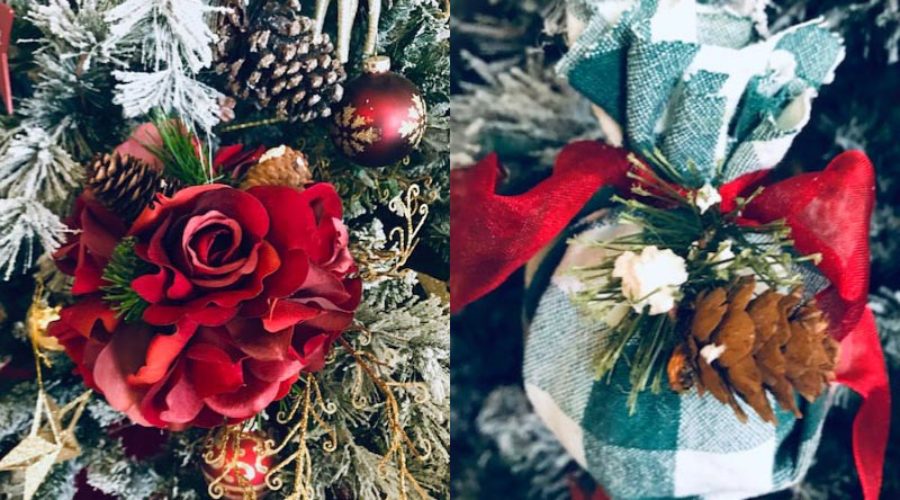
These Woodland Christmas Ornaments are sweetly rustic and celebrate the beauty of nature without needing to live near the woods to make them. I wanted to create ornaments that are as beautiful as designer ornaments, but inexpensive to make. I created mine to match my woodland Christmas theme by choosing a calico fabric and dark rose silk flowers that remind me of my Grandmother and her snowy Christmases, but you can choose fabrics and flowers that work with your home just as easily. Just wait until you see how easy these Woodland Christmas Ornaments are to make!

Welcome to Day 6 of the Fourth Annual 12 Days of Christmas Series!

We have teamed up with 50 plus bloggers to bring you a oodles of DIY Ideas and Recipes to make your holiday season merrier. There are 12 different posts in the series and we have spread them out over a four week period with three posts per week. Now is the time to subscribe!
GO HERE for the complete list of Dates and Topics plus a collection of most popular holiday ideas including ornaments, games, recipes and more from all 50 plus talented bloggers!
It’s Day 6 and we are sharing DIY Ornament Ideas!
You all know how much I love a Woodland Christmas. Just check out my cocoa bar printables from last year and you’ll know that I’m obsessed. But I have multiple trees and so I don’t want them to be matchy matchy but I do need them to coordinate. That’s why I make some ornaments that are woodland rustic, and others that are elegant with a touch of natural elements.

This year, that means that I made Green Calico Check Woodland Christmas Ornaments, and Woodland Flower Ball Christmas Ornaments. Which leads me to…
Why I make new Ornaments Every Year and Why You Should Too.
I make a set 8-12 ornaments for each tree each year. Ok, most years. But there’s important reasons for this besides the fact that I enjoy crafting while watching Hallmark Christmas Movies.
- To avoid having the mismatched, nothing coordinates tree.
I once heard a stylist say that people wear way too much jewelry for a seemingly good reason. It’s the necklace your mom gave you paired with the bracelet from your husband, the rings that your grandma left you and an anklet that got while scuba diving with the girls plus the earrings that match the outfit. All this results in a cluttered, not very stylish ensemble.
The same goes for Christmas trees. Too many single ornaments that don’t have a mate just make your tree look messy—even if you own every Hallmark Collectible Ornament. These single ornaments look so much more beautiful when surrounded by simple, coordinated ornaments that give the tree a finished look.
- To create vignettes.
Designers group ornaments together in a single area to create points of focus on the tree. Want to draw attention to your most beautiful ornaments? Surround it with coordinating balls, picks and ribbon bows. Do this and you’ll notice more people stopping to admire your tree.

- To keep things interesting.
Everyone grows tired of their ornaments over time. Maybe your tastes have changed or you’re dying to try a new trend or color scheme. By making new ornaments every year, you get to change your tree over time. And unless you have unlimited Christmas storage, it forces you to say goodbye to a few ornaments every year without guilt.
- Because you don’t need to break the bank to have a trendy tree.
Every year there’s a new “It” tree. That’s because retailers need you to buy decorations every year, so they need to inspire with a completely new look every year. It’s like watching a yo-yo. One year it’s blush flowers with black and silver balls, the next it’s a silver and blue nautical inspired tree.
Luckily, both of those trees have silver in common, so you can try the trend without having to buy all new ornaments. Pull in the new stuff by using them as your focal point for new vignettes and surround them with what you already own.
So, on to the tutorial. Remember that you can use the fabric and flowers that work for your tree.
Fabric Covered Ornament Balls

Super easy, these Woodland Christmas balls are a great way to recycle cheap plastic ornaments that you can get everywhere.
Simply cut a circle (I used my dinner plates as a pattern) out of your fabric of choice for each ornament.
Set the ornament in the center of the fabric circle and gather the fabric together at the top. Use some hot glue to hold the fabric firmly in place.
If you like these Woodland Ornaments, check out our buffalo check ornaments from last year!
Tie a piece of wire edged ribbon around the top of the ornament and add a little dot of hot glue behind the knot to keep it in place.
Glue a pick to the center of the ribbon knot. I used a single pick for every three ornaments because the picks were too large and overwhelmed the ornament. By using wire cutters, I created three mini picks out of a single large one.

Silk Flower Balls
I love these ornaments because they’re big and dramatic, but they start by using a small Styrofoam ball. You can get a 6 pack of these 2.5” Styrofoam balls at the dollar store, but when covered with flowers and sprigs, they are almost 6” in diameter so you don’t need to spend a lot to get a big impact.

These are so easy! Here’s what you’ll need for each ornament:
- 5” Styrofoam ball
- 12-14 silk flowers
- 8 inches of thin floral wire
- Optional: floral items to fill in spots between the flowers such as evergreen stems, pinecones, and floral picks.
Create your ornament hook. Start by taking your floral wire and push it through the middle of the Styrofoam ball, pushing it from the top all the way through the bottom of the ball, leaving 3-4 inches of wire hanging out of the top of the ball. Then bend the bottom of the wire over and put it back up through the ball from bottom to top. Put a dab of hot glue on the bottom of the wire to hold it in place. This creates an anchor that keeps the wire from pulling out of the Styrofoam ball once you have all those heavy stems glued on. Bend the top wire over and twist it around itself to create a loop to hang the ornament from.
Purchase a silk flower bush in your theme color. Using wire cutters, separate the flowers from the stems, leaving a ¼ inch of the wire stem attached to the flower. Dab hot glue on the wire stem and push the flower into the Styrofoam ball. Each ornament requires 12-14 flowers to complete, so pick them up on sale.
You can also use Christmas floral picks or embellish with evergreen stems in between the flowers. Just have fun with it!

I’d love to see what you make! Tag me on Instagram @blowingawaywest. Don’t forget to follow me on Pinterest for tons of Christmas ideas. And, I’d love it if you’d give the sidebar some love and sign up for my ideas and freebies letter—signing up gets you access to my HUGE FREEBIE LIBRARY. Talk about project overload! You’ll find tons of printables, projects and patterns there.
I share my ideas on these link parties and you should too!
Scroll down for many more DIY Ornament Ideas for your holiday season!


